
Happy Friday!
And to start this looong weekend off right, here's one of my all time favorite projects: screen printing. Screen printing combines all of my favorite things into one super craft. I'm pretty smitten with it.

Fair warning: this post is SUPER long.

For ease of explaining, I'm going to split it up into 3 parts: design, preparing the screen, and actually printing.
Part 1: Designing the Screen
The first thing I do when designing anything is to get it on paper. I'm not a master artist, but I generally figure out what I want simply by scribbling on paper. The top yellow piece of paper is my very first attempt. After creating a concept, I found a font that sort of looked like what I wanted but not exactly. {It's the middle picture in the top, and I cannot for the life of me remember the name of the font.} I simply used a pen to change the parts I didn't like. I added flourishes in some places and deleted them in others. I also moved around some of the letters to make them fit how I wanted them. I then drew a new page with sharpie and made several copies of it so I wouldn't mess up the original. Once I was satisfied with that I colored everything in black and scanned it into Photoshop.

If you don't have Photoshop, there's a free product called Gimp that's supposed to be similar to Photoshop. You can also download a free 30 day Photoshop trial. And if you're in school, check your school's computer department because you can often buy software at discounted prices. That's how I bought mine. I got an entire Adobe package for $300, when Photoshop alone costs double that.
Once in Photoshop I simply colored in all of the words to make them completely black. You'd be surprised what you miss with a marker.
 |
| On the left is the finished version and the right is the original scan. And I used the same screen to make 2 different sets of towels...in case you were thinking it didn't really make sense right now. |
Since the Lake LBJ part was curly and whimsical, I wanted to contrast that with a very straight and clean font for the other words. I used "Champagne and Limousines" It's a free font and can we downloaded here. And it's pretty awesome. I then just moved the words around until I was happy with the placement. A word to the wise with Photoshop: turn on the smart guides. They're make lining everything up so much easier.
Print the design out on a transparency. Print 2 copies, because you want the black parts to be completely black. I simply ordered it on Fed-Ex and picked it up 20 minutes later. It only cost like $1.50 Tape the sheets together so they don't slide apart.


Step 2: Prepare the Screen
Time to prepare the screen. You're going to need a screen printing kit, like this one from Speedball. I purchased mine at Michael's. It was supposed to be around $60, but I used a 40% of coupon. I know that's kind of steep for a craft project, but it's SO worth it.
 |
| Please ignore my the mess in background. I may have fallen asleep on the futon in my office a couple of nights this week. |
DON'T read the instructions that come with the kit. They're super confusing and pretty intimidating. Instead read this tutorial from Lil Blue Boo. It's the best one I've ever found. It's so thorough that I can't really contribute anything meaningful to it.
But here are a couple tips from me. The kit comes with 3 tubs of paint and 4 bottles of stuff and then a teeny tiny bottle. Ignore all of the bottles except this one.

Take the tiny bottle and fill it halfway with water. This is the sensitizer. Using a paintbrush swirl all of the dried stuff into the water. You need to get all of the sensitizer out, because it's what reacts with the light. Dump the sensitizer mix into the Photo Emulsion bottles (above) and thoroughly mix. The Photo Emulsion will start out blue and will end up "slime green" as Ashely explains in her tutorial.
Keep following her tutorial. Spread the green goo all over your screen in a nice even layer and let dry.
Once your screen is dry, it's time to expose it to sunlight. Assemble what Ashley calls the "screen sandwich."
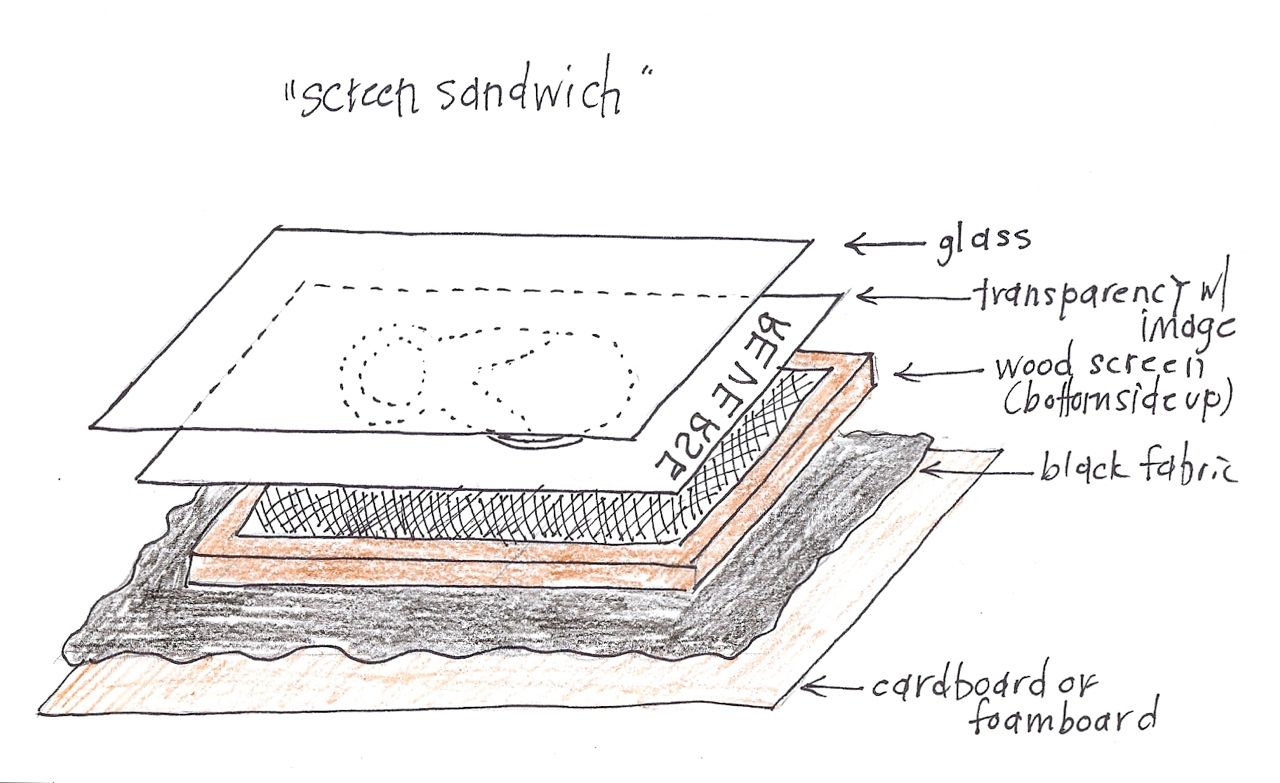 |
| Photo from Little Blue Boo |
Keep it covered until you get outside and then uncover it. The green part will start to turn a gray color, which is correct. The black parts of the transparency will keep the words from graying. The graying is basically baking the green stuff onto the screen. Read her instructions for a better description and how to know when to stop exposing. It only took me about 2 minutes for my screen to expose.
Take your screen inside and put it in the sink. Spray it. After a couple of minutes the parts where the letters were will begin to wash away. It's a pretty awesome experience. Keep spraying until you get all of the green goo off the screen. The gray part won't wash away. This is what your screen will look like when you hold it up to the light:
Congrats! You've just made a screen!
Step 3: Painting
Alright, this is the easy part.
Use painters tape to tape around the edges. This will keep paint from leaking through the edges, which probably aren't 100% blocked (at least mine weren't). Also, if you're using your screen for double purposes like I was or you want to use multiple colors, simply tape off the parts you don't want to use then. So I taped off the "Est" and the "K&L Simmons." I used those words for some towels I made for a wedding gift.

Simply lay whatever you're going to paint face up on a piece of cardboard. The cardboard provides stability and keeps paint from bleeding through. Iron the fabric before trying to paint. Otherwise your words will not paint evenly. {Ask me how I know this.}
Take your screen inside and put it in the sink. Spray it. After a couple of minutes the parts where the letters were will begin to wash away. It's a pretty awesome experience. Keep spraying until you get all of the green goo off the screen. The gray part won't wash away. This is what your screen will look like when you hold it up to the light:
 |
| The part where the light shines through is where the paint will go through. |
Step 3: Painting
Alright, this is the easy part.
Use painters tape to tape around the edges. This will keep paint from leaking through the edges, which probably aren't 100% blocked (at least mine weren't). Also, if you're using your screen for double purposes like I was or you want to use multiple colors, simply tape off the parts you don't want to use then. So I taped off the "Est" and the "K&L Simmons." I used those words for some towels I made for a wedding gift.

Simply lay whatever you're going to paint face up on a piece of cardboard. The cardboard provides stability and keeps paint from bleeding through. Iron the fabric before trying to paint. Otherwise your words will not paint evenly. {Ask me how I know this.}

Add a small amount of paint at the top of the screen. And use the spreader thing to spread the paint across the screen. Go back and forth a couple of times to make sure you didn't miss any spots.


Remove the screen and viola! Your own screen printed creation!
 |
| I recommend doing a couple of practice runs with some scrap fabric before using your final fabric. Just in case. :) |
And this is why you use the cardboard:

I used them to wrap the gifts for our group birthday party.

That's really all there is to it. It's seriously my new favorite thing. Even Jason is smitten with the idea of screen printing. He has me lined up to create about 5 different t-shirts for him.
Let me know if you have any questions! And again, go check out Ashley's post on it. She does a fantastic job explaining the entire process. I kept her post on my computer the first time so I could easily refer to it during the process.
Have a safe and happy Labor Day! I'm off to soak up some rays {and read about oil and gas} at the above mentioned lake! And thanks so much for all of the sweet comments yesterday! They made me smile knowing I'm not alone in the whirlwind of law school!
No comments:
Post a Comment